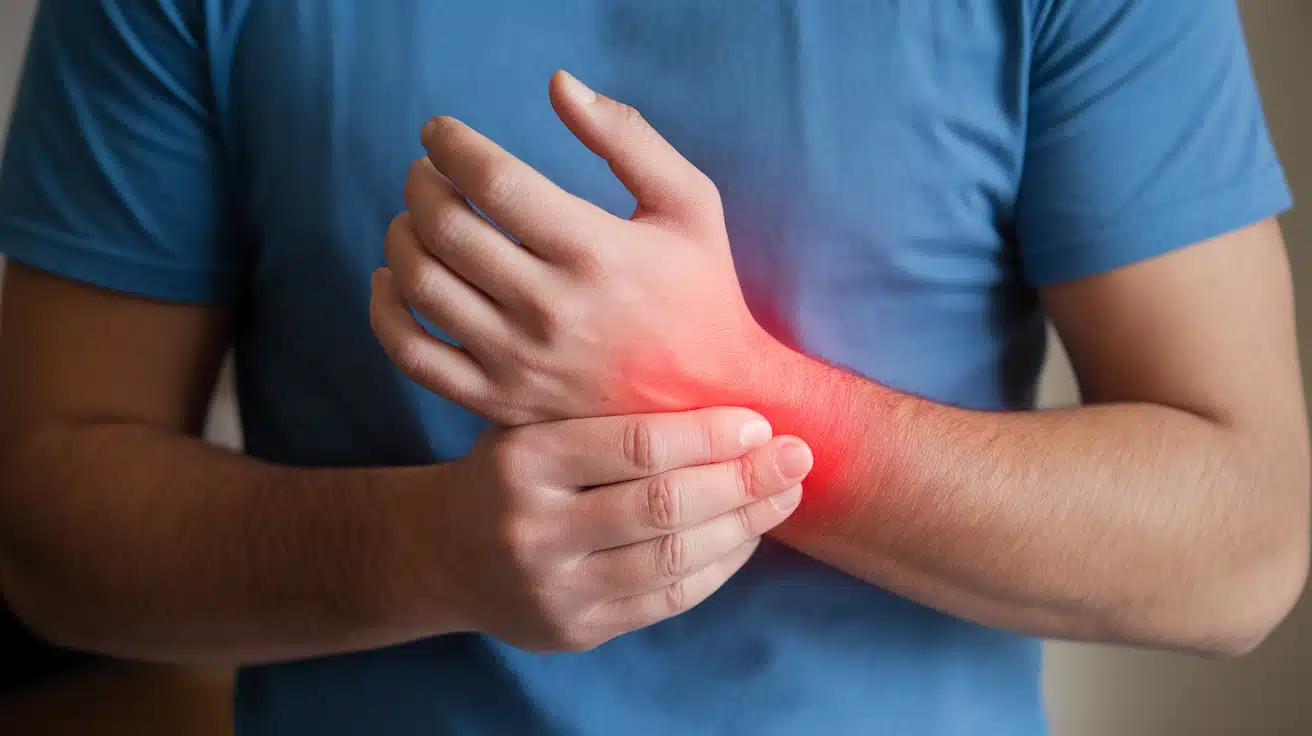
A sudden twist or fall leaves your wrist throbbing with pain. You can’t tell if it’s a minor tweak or something that needs medical attention.
Wrist sprains are a common injury that affects millions of people each year. Without proper care, these injuries can lead to chronic pain and weakness that lasts for months.
However, most wrist sprains heal completely with the right treatment approach and patience during the recovery process.
You’ll learn how to identify sprain symptoms, understand different injury levels, and follow proven treatment steps along with realistic healing timelines and practical ways to prevent future wrist injuries.
What is a Wrist Sprain?
A wrist sprain is an injury that affects the ligaments – the strong, fibrous tissues that connect the bones in your wrist joint. These ligaments act like natural rubber bands, providing stability and support while allowing normal wrist movement.
How Wrist Sprains Occur
Your wrist contains multiple small bones and numerous ligaments that work together. When sudden force or awkward movement happens, these ligaments can:
- Stretch beyond their normal range (mild sprain)
- Partially tear (moderate sprain)
- Completely rupture (severe sprain)
Symptoms of Wrist Sprain
Recognize the common signs early; some appear immediately, others develop over a few hours, so you can start proper treatment sooner.
Common Symptoms
Your body gives clear signals when ligaments are damaged. Watch for these key indicators.
- Pain that gets worse with movement
- Swelling around the wrist joint
- Bruising or discoloration
- Stiffness and limited range of motion
- Tenderness when touched
- A popping sound when the injury happened
Quick Self-Checks:
Try these simple at-home checks to assess the injury and determine if you need medical care.
- Can you move your wrist in all directions? Limited movement suggests a sprain.
- Is the pain sharp when you bend your wrist backward? This often indicates ligament damage.
- Does gentle pressure on the wrist cause significant pain? This points to tissue injury.
Know when to seek help:See a doctor if you can't move your wrist at all, have severe pain, or notice numbness in your fingers.
Causes of Wrist Sprains
Most wrist sprains occur during falls when people extend their hands to break the impact. This natural reflex puts enormous stress on the wrist ligaments and can cause them to stretch or tear.
Understanding what causes wrist sprains helps you avoid situations that put you at risk.
- Sports injuries: Contact sports like football, basketball, and soccer often lead to wrist sprains. Athletes also get injured during gymnastics, skateboarding, and snowboarding when they fall awkwardly.
- Everyday accidents: Slipping on wet floors, tripping while walking, or falling off bicycles commonly cause wrist injuries. Even simple activities like carrying heavy bags can strain your wrists if done incorrectly.
- Repetitive stress: People who do repetitive wrist motions at work face higher risks. This includes typing, assembly line work, and using vibrating tools for long periods.
- Age and lifestyle factors: Older adults have weaker bones and ligaments, making them more prone to injuries. Poor physical fitness and a history of previous wrist injuries also increase your risk of re-injury.
Grades of Wrist Sprains
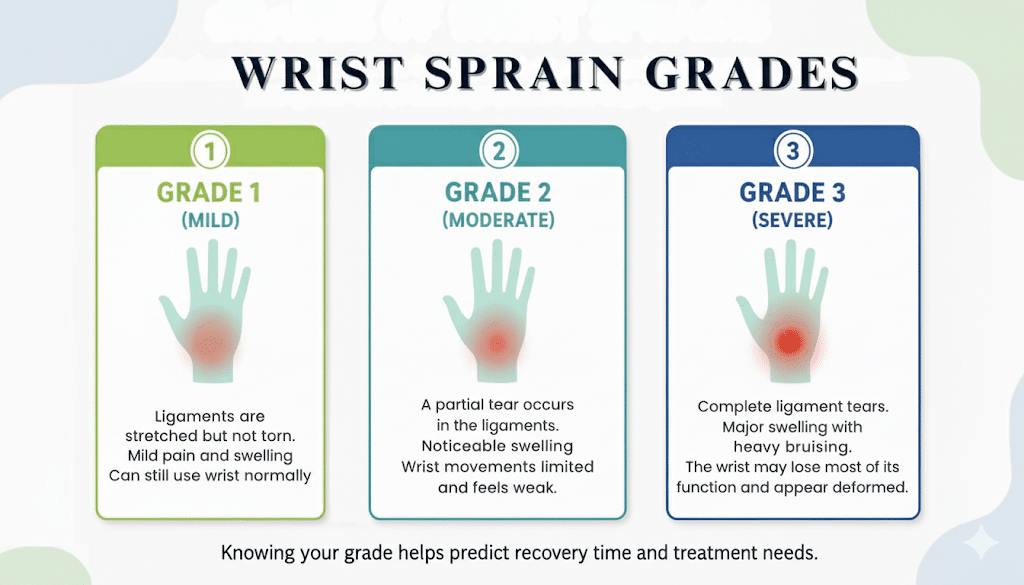
Doctors classify wrist sprains into three grades based on how badly the ligaments are damaged. Each grade has different symptoms and healing times.
- Grade 1 (Mild): Ligaments are stretched but not torn, causing mild pain and swelling. You can still use your wrist normally with only slight discomfort.
- Grade 2 (Moderate): A partial tear occurs in the ligaments, leading to moderate pain and noticeable swelling. Your wrist movement becomes limited and feels weak during daily activities.
- Grade 3 (Severe): Complete ligament tears cause severe pain and major swelling with heavy bruising. Your wrist may lose most of its function and appear deformed.
Knowing your grade helps predict recovery time and treatment needs.
Treatment Roadmap for Wrist Sprains
The right treatment approach depends on the grade of your sprain and how quickly you initiate care. Acting quickly within the first 48 hours can significantly impact your recovery speed.
1. Immediate Care (first 48 Hours)

The first two days after an injury are crucial for controlling damage and initiating proper healing. Follow the RICE method to give your wrist the best chance for quick recovery.
- Rest: Stop using your wrist for activities that cause pain. Avoid lifting, twisting, or putting weight on the injured area.
- Ice: Apply ice packs for 15-20 minutes every 2-3 hours during the first two days. This reduces swelling and numbs the pain.
- Compression: Wrap your wrist with an elastic bandage to control swelling. Make sure it’s snug but not so tight that it cuts off blood flow.
- Elevation: Keep your wrist raised above heart level when possible. This helps reduce swelling and improve blood flow.
2. Ongoing Treatment

After the initial swelling goes down, you can focus on managing pain and gradually restoring movement. These steps help your wrist heal properly while preventing complications.
- Pain management: Over-the-counter pain relievers, such as ibuprofen or acetaminophen, help control pain and reduce inflammation and swelling.
- Gentle movement: After the first few days, start gentle wrist movements to prevent stiffness. Move slowly and stop if pain gets worse.
- Support: Use a wrist brace or splint for daily activities. This protects your wrist while it heals and prevents re-injury.
Severe sprains may need physical therapy or surgery. Your doctor will determine if you require additional treatment based on your progress in healing.
Healing Time and Return to Activity
Sprained wrist recovery time varies based on the severity of your sprain and how closely you follow the treatment plan. Most people want to know exactly when they can return to their normal activities.
| Sprain Grade | Healing Time | Return to Light Activities | Return to Sports/Heavy Work | What to Expect |
|---|---|---|---|---|
| Grade 1 (Mild) |
1-2 weeks | 2-3 days with support | 1-2 weeks | Minor discomfort, nearly normal function |
| Grade 2 (Moderate) | 3-6 weeks | 1-2 weeks with protection | 4-6 weeks | Limited movement, gradual strength return |
|
Grade 3 |
6-12+ weeks | 3-4 weeks with splinting | 3-6 months | Major limitations, possible therapy needed |
Sign you’re ready to return: Your wrist should have no pain during rest and minimal pain during movement. You should be able to move your wrist through its full range of motion without significant discomfort. Grip strength should return to near-normal levels before resuming sports or heavy lifting.
Conclusion
Wrist sprains don’t have to control your life when you know how to handle them properly. What matters most is giving your wrist enough time to heal before returning to normal activities.
Protect the wrist early, stick with a graded rehab plan, and build strength to prevent any more such future problems.
You’re ready to progress when pain is minimal, range of motion is near full, and grip strength is close to your other hand.
Begin range of motion work once pain allows, and seek care if pain spikes, numbness appears, or motion stalls.